
|
|
|
||||||||
|
|
|||||||||
| Home | Forums | Register | Gallery | FAQ | Calendar |
| Retailers | Community | News/Info | International Retailers | IRC | Today's Posts |
 |
|
|
Thread Tools |
|
|
#1 |
|
I'm cheap, and curious, so rather then spending over $100 on a claymore, I made my own.
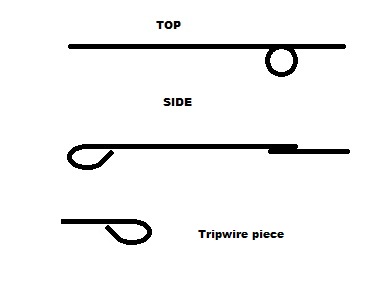
Materials required: Victor Rat trap x2 Victor Mouse trap x1 Small hinge x2 Strong Rip-stop cloth 50cmx 6.5cm (20"x 3") Wooden shelf 16cm deep by at least 50cm long (6"x 20") Wood screws (1.5" long) Green braided fishing line (not mono-filament) Straight braces X2 (optional) I used a press-board shelf as that's what I had on hand. If i were to do this again I would definitely suggest a solid wood shelf instead. Step 1 Prepare the 2 rat traps as follows, Remove the trigger and trigger arm circled in green Cut the wooden base at the red marks  BE CAREFUL, these traps are powerful. Step 2 Rip the length of the shelf to give you pieces as follows, 2x 'A' x 'B' (Pieces 3&4) 2x 'A' x shelf width -'B' (pieces 1&2) 'B' should be equal to the width of the rat trap plus 2x the thickness of the shelf 'A' should be 25cm  Step 3 Assemble the rat traps and Pieces 1&2 ontop of Piece 3 as in the above image. Use screws to fasten in place. The traps will be placed so that they snap outwards. When the trap is armed the bar should be in the center. Leave a space between the two traps. Once you have the traps fastened down cut a piece of scrap from one of the traps to fill in 1cm at the bottom of the gap between the traps. You can also cut any scrap pieces of wood to fill in the gaps at the ends, this is optional but will give the claymore a little more strength. Step 4 (optional but highly recommended) To make safety bars straighten out the trigger bars that you removed in Step 1. Now drill holes in pieces 1&2 so the safety bars can go from top to bottom and hold the bars on the traps in a compressed position. Step 5 With the traps compressed and the safety bars in place thread the strip of cloth through the traps so that it makes a single loop around both bars. Sew this firmly. I used mono-filament fishing line to do this. The claymore should now look something like this: Step 6 Fasten Piece 4 on the front of the claymore using the 2 hinges to connect it at the bottom to Piece 2. Put one of the 1.5" screws into Piece 4, 2cm from the top and centered. The screw should be almost all the way through but not quite. Step 7(Optional) Fasten the 2 brackets onto the sides of the claymore and sharpen the ends so you can jab it into the ground Step 8 Now for the part that took me the most time to figure out. How to make a trigger that's secure, but sensitive enough to be used as with a trip wire. Remove the trigger bar from the mouse trap. Bend a loop into it so that it looks as below. Use a second piece of wire from the mouse trap to make a small tripwire piece as below.  Use a screw and couple washers to attach the trigger bar to the top of the trap. The screw will go through the loop in the trigger bar. One washer goes below, one above, tighten enough to hold in place but not to impede movement of the trigger bar. Put the two staples that held the rat trap trigger plates side by side at the end of the long arm of the trigger bar as you can see in this image: Step9 Attach a small loop of fishing line to the loop on the end of the long arm of the trigger bar. (note, I used twine but found it's wearing out very quickly) Attach another loop of fishing line to the screw on Piece 4. This loop needs to be just long enough to reach the small arm of the trigger bar. Attach a long piece of fishing line to the screw on Piece 4. Attach the tripwire piece about 25cm (10") along this line. Tie it on firmly so it won't move at all. I tied the rest of this to the wooden part of the mouse trap and wrapped it around so I had my tripwire and it wouldn't get tangled Step 10 ARMING THE CLAYMORE a) Compress the rat traps and install the safety bars. b) Spread the cloth out and press the center into the gap between the rat traps. Fill it with BBs and fold the excess on top of them to hold them in place. c) Place the loop of fishing line on Piece 4 over the small arm of the trigger bar. d) Put the small loop on the long arm of the trigger bar between the two staples. e) Put the tripwire piece under the staples and through the loop. f) Place your claymore and run the trip wire, fasten the end of it, or leave it loose so you can pull it by hand. g) double check the trigger and remove the safety bars Step 11 Enjoy the surprised yelp as your unseen claymore springs open on some unsuspecting victim. Last edited by Lumi; February 19th, 2011 at 23:57.. |
|
|
|

|
  |
|
||||||
| Bookmarks |
|
|
 |